Just a Simple Wrench
by Ann & Jake Snyder
Getting Lucky
 We knew the oil leak from the front dampers would require attention. Topping off with shock absorber oil (we purchase ours from Mr. Twist when we attend one of his technical sessions) was literally the least we could do. Within a month, however, the '73 GT felt as though it were skidding on even mildly bumpy turns at very low speeds. This, we have learned, means that it is time to check the front suspension and avoid additional expense before a spring breaks.
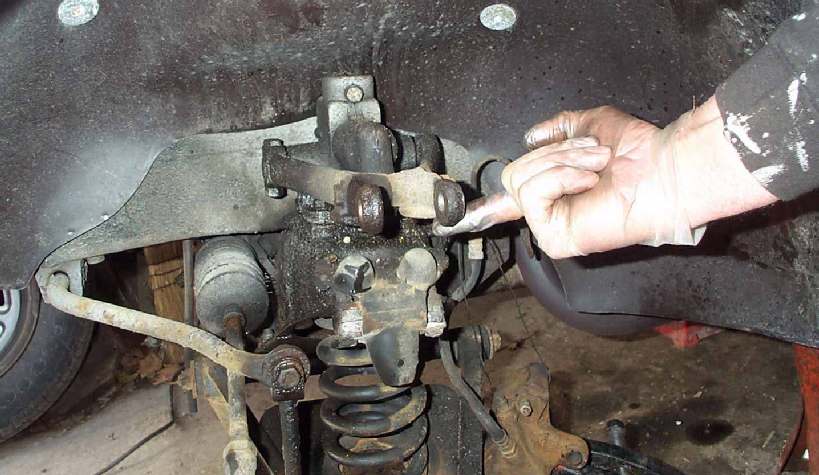
We referred to Section K of our Bentley manual for a review of the front suspension components. As ever, we noted that the description in Section K, while technically complete and correct, gives no warning of the extreme difficulty, hard physical effort and inherent danger in working with the front suspension. Most of the maintenance and repair procedures on an MG can easily be accomplished with little more than a three-eighths inch drive socket set, a half-inch combination wrench and a pair of pliers. However, we reasonably expected to use the big tools on the front suspension, including the long half-inch ratchet, the air impact wrench, the oxygen-acetylene torch and, just in case, the Sawzall with a new ten-pack of bimetal blades. The heavy wrenches, the heat-source and the metal saw are generally necessary to remove the fulcrum pin that attaches the top king pin trunnion to the shock absorber arm (Item 11, Plate K.4).
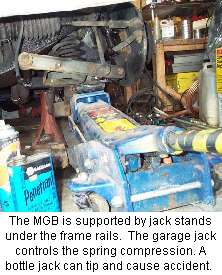 Getting squashed under a car takes all the fun out of the experience. With this in mind, we jacked the car from under the center of the front cross member and placed steel jack stands under the frame rails that run from the engine compartment under the floor panels. We disconnected the battery so the starter could not run the car off the jack stands in some freak accident, and then we tried to push the car off the jack stands by hand. Nothing moved, so we were confident that the car would stay in the air no matter what violence was necessary.
Next, the front road wheels were removed from both sides, and the inspection began. Most obviously, the brake rotors were due for replacement because the swept area had rusted to half what it should have been. Both sides had rebound buffers in good condition (Item 40, Plate K.4.), but one side had a much heavier leak from the shock absorber. The external leak on a shock absorber means the shaft seals are worn, but the problem with skidding meant the internal piston seals were in very bad condition. In other words, we went about replacing the left front shock absorber with the worst external evidence of failure, and hoped that it was the shock absorber with the worst internal condition, as well.
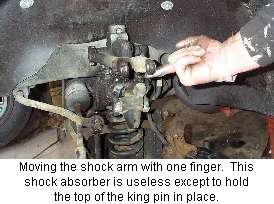 We removed the brake caliper and hung it aside on 14 gauge iron wire to keep it from being damaged. Then we raised the left front A-arm by placing the hydraulic floor jack under the spring pan. A bottle jack is very dangerous because it can easily tip over, and the spring pan will fly down, with pretty much the same effect on a person as being squashed. The fulcrum pin nut was removed, and a truly wonderful thing happened: the fulcrum pin was tapped out with a small hammer and a punch! The impact wrench, torch and metal saw would not be necessary. The top end of the king pin swung out and away. The left shock absorber was the correct one to replace first, as the lever could be lifted through its full range with one finger. The only function it was serving on the car, though not a minor one, was to hold the top of the king pin in place.
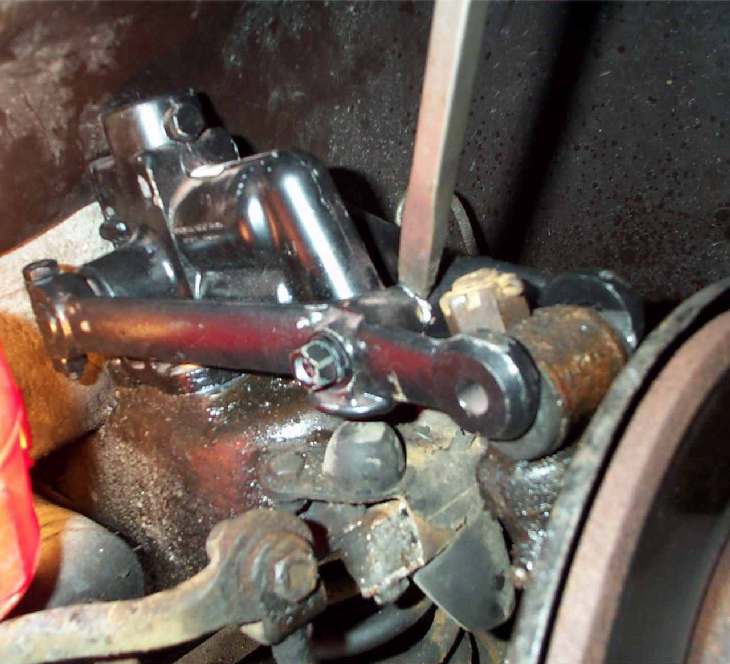
Unbolting the shock absorber is simple, even with the under-fender guards that we use. We ran a tap through the bolt holes (3/8-24), and verified that the bolts were not too long-we have found bolts that were installed with two or more lock washers to keep the bolts from bottoming out. The extra lock washers break and fall out over time, and the bolts no longer keep the shock absorber tight. This "eggs out" the mounting hole and also puts more stress on the bolts. New grade eight bolts one inch long (verify the length) are always good insurance.
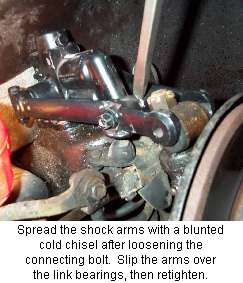 The replacement parts we needed consisted of a rebuilt shock absorber purchased from a vendor at the February swap meet, two link bearings (Item 12, Plate K.4.), the shock mounting bolts, lockwashers and a new castellated nut and split pin for the original fulcrum pin. The fulcrum pin was coated well with anti-sieze. Reassembly was the reverse of disassembly, with the following exception: the shock absorber arm will not slide over the new link bearings inside the upper trunnion. The bolt that holds the two shock arms together was loosened, and a blunted cold chisel was tapped between the shock arms just enough to force them over the link bearings.
Now the GT handles very nicely, and when the off-side damper fails, perhaps we will get lucky again.
|