Chicagoland MG Club

Back to Archives
Submit an article
Cover
Intro & Club Officers
Left Hand Drive
Right Hand Drive
October Meeting Report
Welcome New Members
Just a Simple Wrench
Tales of the Mongrel
Last Gasp Autocross
MG Abingdon Weekend
Scary Halloween Rally
Fall Tune Down Party
A Little Jocularity
Annual Holiday Party
2006 Amtrak Road Trip
MG 2006 Update
Regalia Items Available
Regalia Order
CMGC Events
Other Events
Classifieds
Blast from the Past
Back Cover
|
|

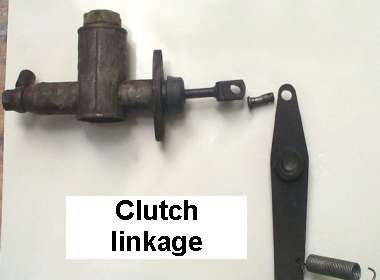
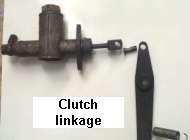
Just a Simple Wrench
Ann and Jake Snyder
Fifty-cent Clutch Repair
(Editor's note: This is not the repair of a rap group)
Fully disengaging the clutch by depressing the clutch pedal is a fundamental concept, and one that only a very few would circumvent deliberately. It is possible, however, to depress the pedal without fully disengaging the clutch without realizing that something mechanical is not as it should be. This can happen when clutch linkage wears, especially as the wear is gradual, and the regular driver adjusts to the deteriorating condition.
 The clutch pedal is suspended on a shaft that also carries the brake pedal, and the top of the clutch pedal is linked to the clutch master cylinder by a clevis pin through the clutch master cylinder pushrod. Every time the clutch pedal is depressed, there is a little bit of wear on the parts that are connected. Considering that the arrangement is hidden under the shroud that covers the pedal box, it is likely that this high-wear point was lubricated only at the factory, if then. To our knowledge, there is no instruction in the manuals to grease this area on a regular basis.
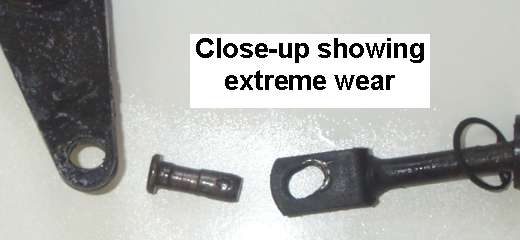
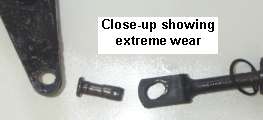 As part of a relatively routine brake master cylinder replacement, we had the pedal box out of one of the MGB/GTs. The wear on the clutch linkage was too much to ignore, so we repaired the toll of thousands of shifts over many years. The human foot travels much farther than does the clutch piston due to the placement of the pivot to minimize foot pressure, and we probably had an extra inch of pedal play. And the lower down the clutch engages/disengages, the better the chance that disengagement will not be complete when gear changes are made.
We first ran into this problem about thirty years ago. Back then, all the parts could be obtained new (not true today) and a clutch pedal still wrapped in the sticky, rust-inhibiting paper was about thirty dollars. These were times when an MGB fuel tank could be filled for five dollars, so that thirty dollars was a major investment at the time. The next MGB we got also needed this repair, but we fixed it ourselves in the way we will describe and which involves welding. Our first welding unit was made by Solidox, and it burned propane using oxygen generated from a perchlorate candle. It made only a small flame, but it worked well enough for simple welding. Our equipment now is much better, but the point is that not having an expensive welding unit is not a reason to avoid the repair.
As part of a relatively routine brake master cylinder replacement, we had the pedal box out of one of the MGB/GTs. The wear on the clutch linkage was too much to ignore, so we repaired the toll of thousands of shifts over many years. The human foot travels much farther than does the clutch piston due to the placement of the pivot to minimize foot pressure, and we probably had an extra inch of pedal play. And the lower down the clutch engages/disengages, the better the chance that disengagement will not be complete when gear changes are made.
We first ran into this problem about thirty years ago. Back then, all the parts could be obtained new (not true today) and a clutch pedal still wrapped in the sticky, rust-inhibiting paper was about thirty dollars. These were times when an MGB fuel tank could be filled for five dollars, so that thirty dollars was a major investment at the time. The next MGB we got also needed this repair, but we fixed it ourselves in the way we will describe and which involves welding. Our first welding unit was made by Solidox, and it burned propane using oxygen generated from a perchlorate candle. It made only a small flame, but it worked well enough for simple welding. Our equipment now is much better, but the point is that not having an expensive welding unit is not a reason to avoid the repair.
We removed the pedal box shroud, the clutch and brake pedals, the clutch and brake lines and removed the pedal box. (We could have removed just the clutch master cylinder, but the pedal box was out because we were working on the brake master cylinder, and getting the brake master in and out with the pedal box in place is just too irritating.)
We took the clutch master cylinder apart because we would be welding on part of it, and because the front was damp with brake fluid. It was time to change the seals.
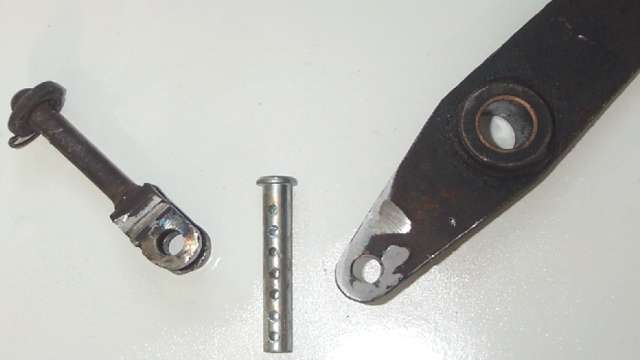
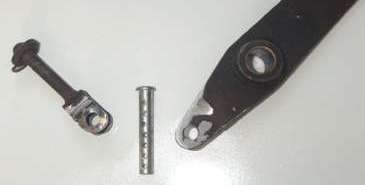
There are three steps to the repair:
a. Welding a piece of a 5/16 bolt in the elongated clutch pedal hole.
b. Welding 1/4 inch washers over the elongated hole in the clutch master cylinder pushrod
c. Buying a new, longer 5/16 clevis pin.
a. Clutch pedal repair: The hole was trued up a bit with a round file and then beveled where the welding bead would go. Part of the 5/16 bolt to be used as filler was ground away before welding because it is much easier to use a bench grinder first than it is to file a lot of steel away after the welding is completed. The bit of bolt was longer than the thickness of the clutch pedal to eliminate any alignment problems. The bolt filler was held in place with a pair of small, long-nosed Vise-Grips while the welding was done. The repair was ground flush and the 5/16 hole returned to size with a file followed with a 19/64 inch drill and then a 5/16 inch drill. There was enough variation due to hand-held drilling to give exactly the right clearance.
b. The washers were held to the clutch master cylinder push rod with a 1/4 inch bolt and nut while the welding was done. The welding was cleaned up on the bench grinder and the hole bored out using the drill sequence as in the clutch pedal repair.
c. The clevis pin had to be longer than the original because the washers added thickness to the push rod. This cost about fifty cents.
We checked the slave cylinder, and though the clevis pin was good, the slave cylinder push rod was worn enough to replace with a new one. We were running a little low on time, but we plan to rebuild this as well and put it back into our spare parts supply.
The clutch master cylinder and clutch slave cylinder were reassembled with new seals after thorough cleaning. The seals were smeared with Lockheed Rubber Lube prior to assembly.
Bleeding the clutch was actually quite simple this time because we left the slave cylinder unbolted from the gearbox and could hold it virtually any direction (the equivalent of turning the car on its front bumper. Gravity bleeding was all we needed to use, though we did try pressure bleeding a little fluid out after everything was back together and verified visually that the clutch slave push rod moved full travel when one of us depressed the clutch pedal and the other of us check for full motion.
This simple repair should increase the clutch disk life, and it is certainly easier to do than replacing the clutch. And, yes, we did coat the repaired parts with a surplus of grease using the heavy, red, waterproof variety. Just what the factory should have done.
|
|