MGB Heater Rebuild tech session
March 9, 2003 - by Wade Keene
I recently had a small tech session to fix the heater on my ’70 MGB. The heater motor had been a bit weak, but then puddles of green liquid started appearing on the passenger floor so it was time to do something about it beyond closing the heater valve and clamping off the return hose since I was going on the Missouri Endurance Rally. I thought defrost capability might be good as I drove around the hinterlands of Missouri.
The day’s work is well documented on the club website, thanks to Barney for that. Some highlights and advice I’d like to pass on would be to do the job when it’s easiest to do it. In an MGB the heater is about the most innermost part of the car, this means to do the work when the dash and center console is off and there aren’t too many, if any, pipes obstructing easy “jiggle room” in the engine bay. If your car is done and driving, this wouldn’t really apply, but if you’re restoring your car there’s any doubt about the condition of the core, I’d replace it. When we were replacing the box, we bent back the tab on the top of the heater box and then bent it back when it had cleared the lip that the hood closes against. This made it much simpler to get the box back in. Part of what made it hard to get the heater box back in position was the heater outlet seal which goes inside the bulkhead area. The one I received was solid rubber, not as hard as tire rubber, but nowhere near as compliant as any sort of foam rubber, which would work just as well. If you order this piece, find out if it is foam rubber or something easier to work with than solid rubber. If not, I’ve seen instructions on making you own seal out of great stuff. I’m sure other ways could be improvised as well. Another thing is to attach the control cable to the heater box flap first, leaving it loose at the other end. Feed it the through the bulkhead panels as the heater box is installed. This is best done with two people. Remember or make notes as to just how the cable was routed so it can end up with a smooth route free of kinks and sharp bends for proper operation.
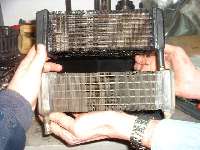
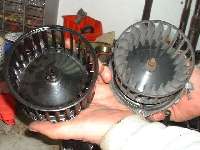
We installed up-rated parts I got from the MG Owner’s Club in England. The heater core (matrix to you hardcore Anglophiles) has more rows and cost me about $50, compared to $70 for a standard unit from Moss; the up-rated blower motor and fan cost $79, compared to standard parts from Moss for $132. You do have to be a member to get the prices I paid, but the non-member prices (if they sell to non-members, you’ll have to inquire) may still be lower than the prices from the usual U.S. suspects.
We haven’t had weather cold enough to report on the new heater’s performance yet, but I will report-next winter God-willing. Thanks to Terry Gaskin, Barney Gaylord, and Cowboy Dave Bralich for the help. Good luck to anyone working on their heater!
More photos and notes at:
More photos and notes at: www.chicagolandmgclub.com/photos/b_heater