Just a Simple Wrench
by Ann & Jake Snyder
 Doing It Yourself
It seems like decades ago, and it was, when a peaceful weekend afternoon meant tuning the twin SU carburetters. It was wonderful how each instruction in the shop manual could be followed perfectly, and the engine would idle perfectly, and then we would blip the throttle, and we could start all over again. This was a perfect game, because it was entertaining and cost only a little for a whole afternoon’s gasoline. And it was never over, because each time the throttle was pressed, the car needed to have the carburetters’ mixture adjusted and be synchronized again. And we understood that many others enjoyed the same entertainment, and all was as it should be. Rebuilding the carburetters in those days meant changing the valve in the float bowl (there were no Grose jets in the beginning) and replacing the various gaskets that came in the “rebuild kit”. These kits were carefully assembled by the supplier to avoid any component like throttle shafts, main jets, or needles that might actually correct any real problems and end the peaceful afternoon entertainment.
Then came a revelation, when we took the University Motors Ltd. course on tuneups. This was really a course on rebuilding carburetters and distributors, and there was no screw or spring or gasket that was left attached in the rebuilding process. And the most important concept was that throttle shafts were not only replaced, but the worn carburetter bodies were made like-new again by reaming them and fitting bronze bushes. There are many warnings in the books about the impossibility of repairing the worn-out bodies that have egg-shaped throttle shaft holes in them from tens of thousands of miles of use. “Just give it up”, the books say, “and shell out a few hundred for new carburetters”. The reason the re-bushing is supposed to be impossible is that the bushes must be in perfect alignment, which means that holes in the carburetter body must be align-reamed and then align-reamed again on the inner diameter to make certain that the holes for the throttle shafts line up perfectly. University Motors Ltd. dared to accomplish the process with custom-made reamers operated on an expensive metal lathe that actually did ream both sides of the carburetter body simultaneously. Needless to say, custom-making a reamer for one or two sets of carburetters would not make any financial sense at all.
We used the set of carburetters we had taken for the tuneup course at UML, and, not unexpectedly, one the other cars started providing the same entertainment that had so engrossed us years before. Knowing what the problem was, however, took all the fun out of setting and resetting carburetters that had air leaking past the throttle shafts, almost never ending up with the same leak after using the throttle. Thus we were faced with sending the old carburetters (or at least the bodies) out for re-bushing, buying new carburetters for hundreds of dollars, or having a custom reamer made and buying a metal lathe for thousands of dollars. While idly glancing through a machine shop catalog, just to see whether there was any way that an expensive metal lathe might have some other use, like mixing paint or bread dough, we came across a listing of reamers. One was particularly interesting because it had a smooth 5/16 inch drive end, reamed a 3/8 inch hole, and cost five dollars. This was definitely in the right price range, and actually works with just a few modifications that take no more than an hour.
The trick is to use the reamer in a backward sense, with the 5/16 end acting as the pilot, and the reamer being driven from the front end ordinarily used to enter the work. Naturally the reamer must be turned counter-clockwise to present the cutting edges of the flutes. The modifications are to grind cutting edges on the trailing end of the flutes, and to attach a nut on the front end with set screws so the reamer can be turned with a wrench or socket.
What you need to do this:
One reamer, 3/8 inch (comes with 5/16 shaft) (Enco number 331-1124, Enco Manufacturing Company, 1-800-873-3626); one 3/8 inch nut; two 8-32 set set screws 3/16 long. Four bronze bushings, 3/8 outside diameter, 5/16 inside diameter and 1/2 inch long (HIF carburetors) or 3/4 inch long (HS carburetors). The shorter bushings will work in HS carburetters, but longer is better because there is more surface to absorb wear and control air leaks. These cost anywhere from twenty-five cents apiece to three dollars apiece depending where you buy them and whether they come pre-lubricated, The most economical and fastest place to get them is from a company that specializes in distributing bearings.

Addendum DEC 4, 2005: The bushings that work are 5/16 inch inside diameter, 3/8 inch outside diameter and 1/2 inch long (3/4 will work). They should be of Oilite bronze. The simplest place to get them is from McMaster-Carr as catalog number 6391K153. You will need four. They cost 43 cents each. The 3/4 inch long bushings are part number 6391K155 for a few cents more.
Addendum JUNE 24, 2011: The ENCO reamer 331-1124 (import for $10.58) is no longer machined for full length of the chucking shank, so is no longer suitable for this job. ENCO reamer 329-1124 (USA made for $17.42 list or $13.99 web) does have the reduced diameter shank and will work for this task (as shown in these pictures).
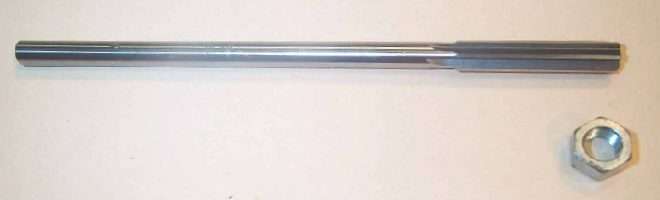
A five-dollar reamer and a 20 cent nut are the main parts needed.
Two 8-32 set screws will hold the nut in place.
|
|
How you do it:
Step one. Bore out the 3/8 nut with a 3/8 drill so it will pass over the reamer. Bore and tap two holes on two flats of the nut for the set screws. Fasten the nut on the front of the flutes of the reamer and tighten the set screws. Grind them off if they protrude. Grind cutting edges on the trailing end of the flutes: This will become the new cutting end.

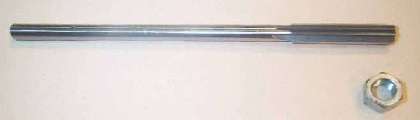
| The assembled reamer, showing one of the set screws. We have also made some reamers by welding, but the high temperature is probably not a good idea for a precision tool. Note that cutting edges have been ground at the original trailing end. We used a die grinder on this reamer, but we have also had perfectly acceptable results using a hard white stone.
|
|
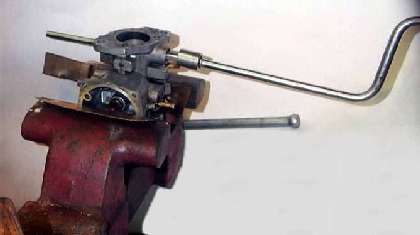
Step two. Disassemble one of the carburetters-do one at a time so there is a reference when something does not make sense. Clean the carburetter body with solvent and a pick. Holding the carburetter body securely in a cushioned vise, and, turning the reamer “backwards”, pass the shaft through the body into the hole on the other side. Ream the near side. Check fit a bushing, then remove it, smear with thread-locker and refit. Then ream the remaining throttle rod hole and fit a bush in the same manner.
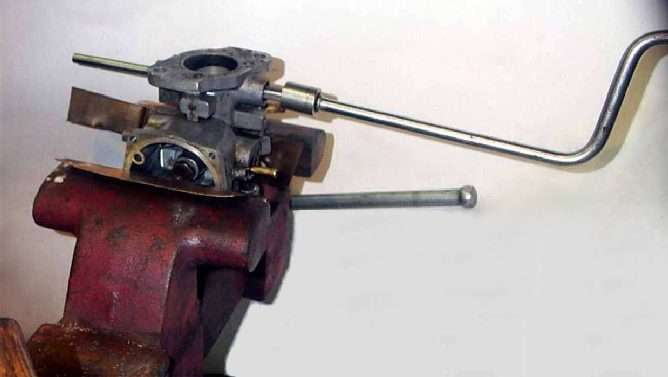
| The carburetter body is held in the vise with brass strips cushioning it. The reamer is best driven by hand, withdrawing frequently to remove the swarf with a gentle air blast. We used WD-40 for lubrication.
|
|
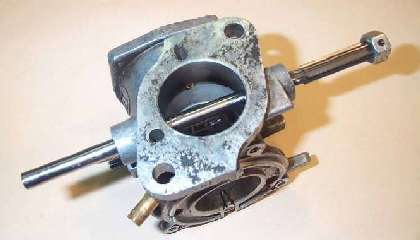
| The reamer is held by the old bushings for the first pass, and by the old and one replacement bushing for the second pass. This process has always worked for us and for several other MG owners for whom we explained the procedure.
|
|
Step three. Rebuild the rest of the carburetter as detailed in Bentley or Haynes. Use a new throttle shaft, main jet, needle, Grose jet, gaskets and seals. Lube the new bushings so they do not wear out right away. Re-bush and rebuild the other carburetter.
Step four. Replace the carburetters, set the mixture and air flow as given in the books, and take the rest of the peaceful afternoon off.
The procedure really is simple. We have used it for several years, and others have produced acceptable results as well. The key for us was taking the course at UML, which gave us the confidence to attempt the re-bushing job with our home-made tool. The advantage of this procedure is that it can be done quickly, standard-size throttle shafts (that is, inexpensive) can be used, and really bad wear in the carburetter body can be corrected without using an oversized shaft and oversized reamer (both expensive). And you did it yourself!