Overdrive Gearbox Installation
August 11, 2001
by Maynard Hirsch
The day was bright and sunny as I thought cruising in Agatha (my 78B; no comments on the name please, the car told me it was her name) with the top down. Then I was brought back to reality as I realized that the tech session was to begin in about an hour, and that the engine hoist I borrowed came without the chain to attach to the engine, so off I went to the hardware store (Trip #1).
I got back as the first guest arrived. We quickly assembled the hoist and moved my boat out of the garage so we would have room to work. I figured the conversion could be done in a day.
Put the B on jackstands, this time without damaging the radiator, and drained the oil and the radiator. Removed the radiator, distributor, and starter, disconnected the car linkage and fuel lines. Things were going smoothly, so I started to worry. Went to disconnect the oil cooler lines. Didn’t have the right size wrench, so I took off the oil filter head, leaving the line connected to it. Still didn’t have the right size wrench for the line to the block. Barney Gaylord had arrived by this time and went to the hardware store (trip #2) for the right size wrench. In the meantime, I started to disconnect the drive shaft, and then I realized that it would be easier to remove the front yoke and undo the four bolts with the gearbox out of the car. I then removed the crossmember. Barney was back by this time, and we removed the last oil cooler line. We removed the bolts for the motor mounts, and connected the hoist. The engine and gearbox started to come out. Oops, forgot the disconnect the wires to the TCSA switch and the reverse light switch. Now the engine and gear box came out.
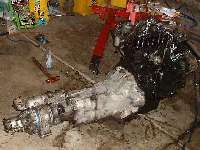
Next I removed the gearbox from the engine. The throwout bearing was well (ab)used with the carbon about gone. Not a problem, since I was going to replace the clutch anyway and had a three piece clutch kit. The flywheel was in good shape, and the driven plate about half gone. Checked the rear main seal, and since it wasn’t leaking, decided if it ain’t broke, don’t fix it.
We then checked the pilot bearing (or spigot bearing) and found that it was worn. I hadn’t planned on replacing it, but fortunately, I had a correct used one that wasn’t worn too badly. Barney installed it with a little locktite, and the work continued. I took the new driven plate from the box, and found it was about 1/2" wider than the old one. Was it doom on me? No, it still fit within the pressure plate without rubbing on anything. Then as we installed the new pressure plate, we found that my clutch pilot tool was slightly undersize. Playing around, we were able to line up the driven plate correctly.
The overdrive was from a Mark II B, and was filled through an dipstick hole on the top. My car, a 78B, didn’t have a gearbox dipstick, and was filled from the side. I had been worried that I would have to cut a hole in the tunnel to provide access, but the wizards at Abingdon, either through foresight, cheapness, or just plain laziness, never changed the tooling for the tunnel, and the access hole was there with a plastic plug. Anyway, since there was no reason not to, and it was easier, we filled the gearbox before installing it.
We went to mate the gearbox to the engine and found, surprise, the bolts were too short. Apparently the holes and the supports on the OD gearbox were about 1/4" longer than the original. Of course, in my research on the project, this was never mentioned, so back the to hardware store (trip #3).
Finally, ready to install. Lowered the engine/gearbox assembly into the car, and attached it to the front mounts. Went to install the crossmember and couldn’t attach the bolts from the mounts to the gearbox. Three or four hours later, we gave up for the day.
One thing I have learned in working on cars is if, there is a problem, it is often best to leave it go for a while and come back to it later. Since it was now dark, and 10 hours after we began, we decided to let it go for a while. This was not a problem, since my loving wife had a full schedule for me to do on Sunday
Monday, back to the car. After thinking about the situation, I thought that instead of using the normal cap head bolts to attach the mounts, Allen head bolts may work. So off to the hardware store (trip #4). By using a long Allen wrench, I was able to get the bolts in.
But when putting the engine in, we noticed that the front mounts while not broken, had sagged. Picked up a pair of new of new mounts (does this count as trip #5?) and went to install them. From experience, I have found that the easiest way to do the left mount is to remove the steering pinion. Pulled the pinion, and went to install the mounts. The mount on the passenger side went smoothly, and went to do the driver’s side. All of a sudden I heard a crack, and the engine dropped. The front rocker arm pedestal stud had snapped, and the engine fell. If that was not bad enough, the harmonic balancer hit the crossmember and broke. Picked up from Barney a new stud, and from Tom Sotomayor a used harmonic balancer ((trip #6 and 7?) Installed them with no problem, and was able to continue the work.
I installed the rest of the components, filled the engine and radiator, and then attacked the wiring. Moss states that the OD wiring is included in the main harness. Ha! Fortunately, in my acquisition of parts for the project, Tom Josefek had known better, and I got an OD harness from him, as well as the mini-harness to the OD switch. With the gearbox in place, I couldn’t reach the OD isolation switch, so I had to lower the gearbox. Attached the drive shaft (fortunately, the yoke splines are indexed, so that there is no possibility of installing it misaligned).
Went to install the steering pinion and found that I couldn’t get the shaft into the u-joint. Apparently, when the shaft had been installed, it had flared out at the end when it was tightened. Pulled the shaft, and removed the flare, and went to install it. It was a real pain trying to align it with the steering wheel. Although the shaft can only fit the u-joint one way, it can fit the rack many ways. I thought I finally had it correctly aligned. Finished putting the rack back together, and filled it with gear oil.
Finally, brought the car down, and went to drive it. Surprise! It works. Now when I go on the road, I can do it at a lower rpm and a lower noise level. I’m interested in seeing what the OD does to the top end. However I found that the steering wheel is not centered. Will have to take care of that.
So, what was supposed to be a one day job took twelve. Was it worth it? Yes. Would I do it again? Yes, put with a little more knowledge now, I think that it really can be a one day project. Things not in any manual? Attach the cross member before attaching the motor mounts. Have a stock of extra long bolts. Talk to people who have done the project before, and ask their advice.
See more pictures and notes on line at
www.chicagolandmgclub.com/photos/odinstal